Checklists in OwlOps are designed to better organize assignments and complete repetitive tasks more efficiently and quickly. To set up the beginning of a checklist, follow the steps below:
Steps
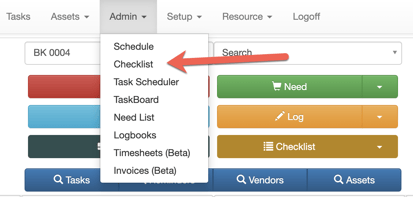
Go to Admin /Checklist
At the bottom of the page, select New Checklist
Fill out the next prompts to begin setting up your checklist.
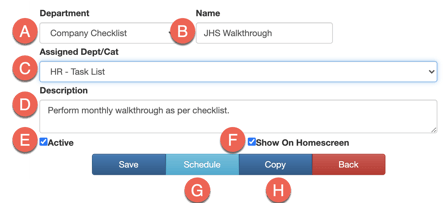
Department - Select the department that the checklist will be available for. Company Checklist (default and most common) allows the checklist to be available to all departments or restaurants. If you want the checklist to only be available to a specific department, use the dropdown arrow to select the department you would like.
Name - Create a name for your checklist. This will be the subject for each checklist task.
Assigned Dept/Cat - When you are creating a checklist task, this allows you to assign that task to a specific department/category.
Description - Add a description that provides some instruction about the checklist.
Active - when the box is checked, the checklist will be active in OwlOps and can be accessed and reported on.
Show on Home Screen - The checked box enables the checklist to appear on the home screen. Deselect if you do not want to the checklist to appear on the home screen.
Schedule - Within checklists, you can schedule your checklist to appear on a regular basis. Review the OwlOps support page How to create reoccurring tasksfor assistance in setting up your schedule.
Copy - Copy an existing checklist and use it as a template to create a new checklist.
Save the checklist set-up information. The next step is now to create your checklist line items.
Free Trial with Full Support
14 days. All the features. All the support. We want to make sure OwlOps works for your team. No credit card. No obligation. No risk.