Scheduling Reoccurring Tasks in OwlOps
Scheduling reoccurring or preventative maintenance tasks allows you to schedule any daily, weekly, monthly, quarterly, or annual tasks that need to be repeated on a regular basis.
Some examples:
- Monthly: Clean coil on cooler display
- Monthly: Joint Health and Safety Checklists
- Weekly: Calibration schedules
- Quarterly: Descale Coffee Machines
The Schedule feature automatically creates, assigns, and communicates tasks in the same way that all other tasks are in the OwlOps system.
Steps
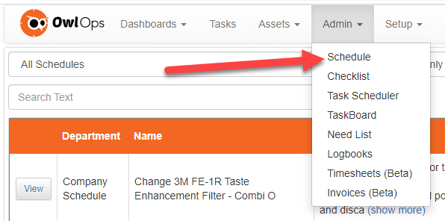
- Go to Admin / Schedules

- At the bottom of the page, select New Schedule

- Fill out the Schedule Setup form and then click Save.

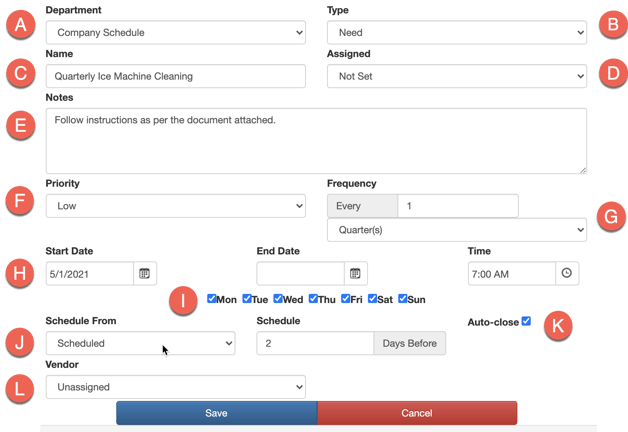
- Department - Select Company Schedule (recommended) or the specific department for the schedule you are creating.
- Type - Select the type of task you would like to schedule (ie. Fix, Do, Need, Log, Project, Checklist). This will determine who the task will be assigned to.
- Name - Create an appropriate name for you scheduled task (ie. Quarterly Ice Machine Cleaning, Change Oven Filters, etc).
- Assigned - When creating a schedule task, this allows you to assign that task to a specific department/category.
- Notes - Here is your chance to add any description, detailed steps, or reference to attached document (future step).
- Priority - Set the relevant priority level for the scheduled reoccurring task.
- Frequency - Set the frequency of how often this task should occur.
- Start Date; End Date; Time - Add the specifics to when the task should be posted and when the task should end (if at all).
- Days - Select the dates that you want the scheduled task to appear (ie. You may only want the department to receive the task on Monday's or Tuesday's) .
- Schedule From - Select when you would like your task to be scheduled from.
The Options are:- Last Completed: Schedules the task from the last time a task was Closed or Completed (Eg. task was created June 1 and completed June June 15; schedule waits 1 month from June 15).
- Scheduled: Schedules the task from the last time a task was created (Eg. task was created June 1 and completed June 15; schedule waits 1 month from June 1).
- Auto-close: If you set up your schedule to be Scheduled (previous step), choosing the auto-close option will automatically close any task from the previous schedule if it has not yet been closed. This helps with accumulating too many lagging tasks that are left open.
- Vendor - Allows the ability to assign the scheduled task to an existing Vendor.
- IMPORTANT - SCHEDULES WILL NOT RUN WITHOUT THIS STEP COMPLETED
On the Details tab, add the departments / restaurants or the pieces of equipment you want the schedule to be available to.
* Here, you can also add additional notes that will appear on the schedule instructions or manually override dates specific to the department/ restaurant.*
- On the Files tab, add any documents or images you want attached to the scheduled task.
- From the Tasks tab, you can view any previously scheduled or current outstanding tasks.